Transforming My Memories: How I Converted Negatives to Digital and Why You Should Too
As a lifelong photography enthusiast, I’ve always been captivated by the magic of capturing moments on film. Yet, as the digital age swept over us, I found myself staring at a treasure trove of negatives, each one a window into the past, waiting to be rediscovered. The question loomed: how could I breathe new life into these silent memories? That’s when I embarked on a journey to convert negatives to digital formats. In this article, I’ll share my insights and experiences on transforming those cherished film strips into vibrant digital images, preserving not just the visuals, but the emotions and stories they hold. Join me as we explore the enchanting world of digitizing negatives, and unlock the potential hidden within those faded films. Whether you’re a seasoned pro or a curious novice, I promise you’ll find a way to bridge the gap between the analog and digital realms, ensuring that your memories are not only preserved but also celebrated for years to come.
I Tried Converting Negatives to Digital and Here Are My Honest Recommendations

KODAK Slide N SCAN Film & Slide Scanner Digitizer with 5” LCD Screen, Quickly Convert Negatives & Slides to Digital 22MP JPEG Photos, Compatible with 135, 126 and 110 Film & Slides

Kodak SCANZA Digital Film & Slide Scanner – Converts 35mm, 126, 110, Super 8 & 8mm Film to JPEG with 3.5″ LCD, Easy-Load Inserts & Adapters

DigitConvert Mobile Film Scanner 35mm, Positive Slide & Negative Scanner Photo Scanner Converts 35mm Slides & Negatives to Digital Photos (2AA Batteries Included)
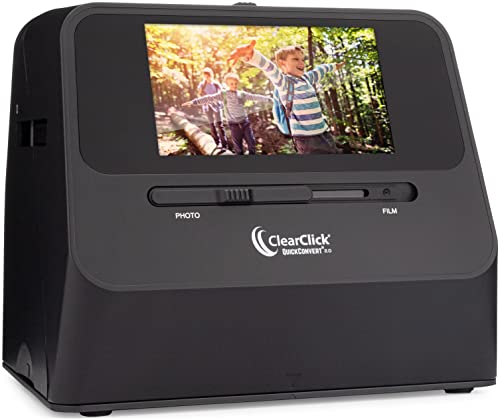
ClearClick QuickConvert 2.0 Photo, Slide, and Negative Scanner – Scan 4×6 Photos & 35mm, 110, 126 Film – No Computer Required – 22 MegaPixels
1. KODAK Slide N SCAN Film & Slide Scanner Digitizer with 5” LCD Screen, Quickly Convert Negatives & Slides to Digital 22MP JPEG Photos, Compatible with 135, 126 and 110 Film & Slides
As someone who has always cherished the memories captured in old photographs, I can’t express how exciting it is to discover the KODAK Slide N SCAN Film & Slide Scanner Digitizer. This product is an incredible tool that allows users like me to breathe new life into our treasured memories by converting old negatives and slides into digital formats. Imagine being able to preserve those priceless moments from family gatherings, vacations, and milestones, all while ensuring they are not lost to time. This product is not just a scanner; it is a bridge to the past, a way to relive and share those memories with friends and family in a modern, convenient format.
The KODAK Slide N SCAN boasts a remarkable 22MP resolution, allowing for stunning JPEG photos that retain the vivid colors and intricate details of the original images. The ability to view, edit, and convert both color and black-and-white negatives is a game-changer. I love that it supports a variety of film types, including 135, 126, and 110, making it versatile for anyone with a collection of old slides and negatives. It’s like having a personal digital archivist at my fingertips, ready to help me reclaim my past.
One of the standout features that I appreciate is the 5” LCD display with gallery mode. This large, crystal-clear screen offers a wide viewing angle, which makes it easy to preview and edit photos instantly. Whether I’m sharing images with family or displaying them as an elegant digital picture frame, the quality of the display enhances the overall experience. It’s a beautiful way to showcase my memories, and I can imagine how much joy it would bring to my family during gatherings.
The convenience of the easy-load film inserts cannot be overstated. The quick-feeding tray technology allows for continuous loading, making the scanning process fast and simple. This means I can spend less time fumbling with equipment and more time enjoying the nostalgia of my old photographs. The inclusion of various adapters and a cleaning brush also shows that KODAK has thought of everything to ensure a smooth user experience. Plus, the USB and HDMI cables provided make it easy to connect to any Type-C USB-enabled computer, further enhancing its compatibility.
Another feature that I find particularly appealing is the one-touch editing capability. The advanced capture software makes it incredibly easy to enhance, resize, and convert photos with just a simple ‘scan’ button. I appreciate that I don’t have to navigate through complex screens or settings. The options to adjust color and brightness, as well as assign date and time, provide a personal touch to each memory I digitize. It’s as if I have my own personal photo editor, making the process efficient and enjoyable.
In addition to its practicality, the KODAK Slide N SCAN is designed with aesthetics in mind. Its gorgeous design seamlessly blends with my home décor, making it not just a functional device but also an attractive addition to my space. It’s a product that I can proudly display, which is an important factor for anyone who values both form and function.
In summary, the KODAK Slide N SCAN Film & Slide Scanner Digitizer is an invaluable tool for anyone looking to preserve their old photo memories. It combines high-resolution scanning, user-friendly features, and a stylish design into one fantastic package. If you’re anything like me and have a collection of old slides and negatives gathering dust, I encourage you to consider this product. It’s not just an investment in a scanner; it’s an investment in your memories and a way to share those cherished moments with loved ones for years to come. Don’t let your memories fade away; take the leap and digitize them today!
Feature Description Resolution 22MP JPEG Photos Compatible Film Types 135, 110, 126mm Negatives & Slides Display 5” LCD Screen with Gallery Mode Loading Mechanism Convenient Easy-Load Film Inserts Editing Features One-Touch Editing, Adjust Color/Brightness Storage Compatibility SD or SDHC Cards Up to 32GB (Not Included) Connections USB and HDMI Output
Get It From Amazon Now: Check Price on Amazon & FREE Returns
2. Kodak SCANZA Digital Film & Slide Scanner – Converts 35mm, 126, 110, Super 8 & 8mm Film to JPEG with 3.5″ LCD, Easy-Load Inserts & Adapters
I recently came across the Kodak SCANZA Digital Film & Slide Scanner, and I must say, it’s an impressive piece of technology that truly revolutionizes how we preserve our cherished memories. As someone who has a collection of old film negatives and slides, I understand the struggle of wanting to convert those physical memories into digital formats without losing their essence. The Kodak SCANZA does just that—transforming your 35mm, 126, 110, Super 8, and 8mm films into high-quality JPEG files in mere seconds. This capability is particularly beneficial for those of us who want to save time while ensuring our precious memories are digitized for future generations.
The scanner boasts a powerful 14/22MP resolution, which means that the images you convert will retain impressive detail and clarity. This is a crucial feature for anyone who has invested time and resources into capturing those moments on film. You won’t have to worry about the quality being compromised; instead, you can expect beautifully digitized images that you can easily share with family and friends or simply cherish for yourself.
The large, bright 3.5” TFT LCD screen is another standout feature. With adjustable brightness and a convenient tilt function, I found it incredibly user-friendly. It allows for easy operation and image viewing, making the entire scanning process enjoyable rather than a chore. I appreciate that Kodak has designed this scanner with the user in mind, ensuring that even those who may not be tech-savvy can navigate the interface with ease.
Moreover, the Kodak SCANZA comes equipped with multiple film inserts and adapters, which means you can seamlessly switch between different film formats. This flexibility is invaluable, especially if you have a diverse collection of films. The one-touch buttons are another thoughtful addition, allowing for a straightforward, one-step scan and save process. I can imagine how much easier this makes the task of digitizing a large number of films, as it simplifies the workflow significantly.
The intuitive user interface is a cherry on top. The helpful tray and insert directory make it easy to get started, and the option to edit the image RGB and resolution means that I can fine-tune my scans to meet my preferences. Even though an SD card isn’t included, the scanner supports up to 128GB, which is ample space for a significant number of scanned images.
Lastly, I find it incredibly convenient that the Kodak SCANZA comes with all the necessary cables and extras. The inclusion of a USB power cable, HDMI cable, AC adapter, video cable, and a free film cleaning brush ensures that I have everything I need right out of the box. This thoughtful detail eliminates the hassle of purchasing additional items separately, which often becomes a pain point for consumers.
the Kodak SCANZA Digital Film & Slide Scanner is an exceptional investment for anyone looking to preserve their film memories in a modern format. Its combination of powerful scanning capabilities, user-friendly design, and included accessories make it a standout choice. If you are like me and have a treasure trove of old films waiting to be digitized, I wholeheartedly recommend giving this product a try. With the Kodak SCANZA, you can finally turn those dusty old films into vibrant digital memories that will last a lifetime.
Feature Description Film to JPEG Conversion Converts 35mm, 126, 110, Super 8 & 8mm negatives and slides to JPEG files in seconds. Resolution Powerful 14/22MP scanning capability for high-quality images. Display Large 3.5” TFT LCD with adjustable brightness and tilt for easy viewing. Adapters Included Comes with multiple film inserts and adapters for versatility. User Interface Intuitive design with helpful tray, insert directory, and easy editing options. Extras Includes USB power cable, HDMI cable, AC adapter, video cable, and a free cleaning brush.
Get It From Amazon Now: Check Price on Amazon & FREE Returns
3. DigitConvert Mobile Film Scanner 35mm, Positive Slide & Negative Scanner Photo Scanner Converts 35mm Slides & Negatives to Digital Photos (2AA Batteries Included)
As someone who has always been captivated by the nostalgia of old photographs and slides, I was thrilled to discover the DigitConvert Mobile Film Scanner. This innovative device offers a seamless way to convert my treasured 35mm slides and negatives into digital JPEG photos, allowing me to preserve memories that might otherwise fade with time. The convenience of this scanner is truly remarkable, and I can’t help but feel excited about the possibilities it presents for anyone looking to digitize their film collections.
The main feature that stands out to me is its ability to convert 35mm slides and negatives easily. I appreciate that the scanner requires no complicated operations or expensive costs. It’s designed for everyday users like me, who may not be tech-savvy but still want to enjoy the benefits of digitizing old memories. The simplicity of the process—viewing, scanning, and converting—is incredibly appealing. I can quickly get started without feeling overwhelmed by technical jargon or intricate setups.
Another fantastic aspect of the DigitConvert Mobile Film Scanner is its foldable design. I often find myself traveling or going on adventures, and the thought of carrying bulky equipment can be a deterrent. However, this scanner folds into a compact size that fits perfectly in my backpack. It’s a game-changer for anyone who wants to preserve their film memories on the go. Whether I’m hiking through the mountains or lounging on the beach, I can bring this little gadget along without it taking up much space.
What’s more, the inclusion of a free app is a significant perk. It’s reassuring to know that I can easily digitize my films and slides using an app that’s readily available. The easy-to-follow manual provided ensures that even those who might struggle with technology can successfully navigate the process. I find it liberating that I have options here; I can use the DigitConvert app or other recommended apps like SlideScan and FilmBox, depending on my needs. This flexibility makes the scanning experience even more enjoyable and tailored to my preferences.
The user-friendliness of this scanner cannot be overstated. All I need to do is insert the included 2 AA batteries, place my slide or negative in the tray, and turn on the LED backlight switch. I can then position my smartphone over the tray and align the camera with the light panel to capture the image. It’s straightforward and intuitive, which is a huge plus for someone like me who values efficiency. The note about photo quality being dependent on my phone’s camera resolution is a helpful reminder, and I appreciate the tip to tap the screen for autofocus if the image appears blurry.
Additionally, the retractable phone clamp feature is an excellent enhancement for stability. I often worry about my phone shifting during the scanning process, leading to misaligned images. With the clamp, I can adjust the position of my phone with ease, ensuring that it remains steady and perfectly aligned with the slide or negative. This thoughtful design element adds to the overall ease of use and gives me confidence that I’ll achieve clear, high-quality scans.
Feature Description Convert 35mm Slides and Negatives Easily digitize old film into JPEG photos without complicated operations. Foldable Design Compact size for easy travel and storage. Free App Includes a free app for digitizing films and options for other apps. Easy to Use Simple setup with included batteries and straightforward instructions. Retractable Phone Clamp Ensures stability and proper alignment for clear scans.
the DigitConvert Mobile Film Scanner is a fantastic tool for anyone looking to breathe new life into their old slides and negatives. Its user-friendly design, portability, and added features make it a must-have for photography enthusiasts and casual users alike. If you’re like me and value preserving your memories in a modern format, I strongly encourage you to consider this product. You’ll not only enjoy the scanning process but also the satisfaction of seeing your cherished moments transformed into digital formats that can be easily shared and enjoyed for years to come. Don’t miss out on the chance to keep your memories alive—give the DigitConvert Mobile Film Scanner a try!
Get It From Amazon Now: Check Price on Amazon & FREE Returns
4. ClearClick QuickConvert 2.0 Photo, Slide, and Negative Scanner – Scan 4×6 Photos & 35mm, 110, 126 Film – No Computer Required – 22 MegaPixels
When I first came across the ClearClick QuickConvert 2.0 Photo, Slide, and Negative Scanner, I was immediately intrigued by its promise to breathe new life into old memories. This scanner is designed for anyone who has a treasure trove of old photographs, slides, or negatives tucked away in boxes or albums, waiting to be rediscovered. With this device, it’s like having a time machine right in my hands, allowing me to transform analog memories into digital formats effortlessly.
The standout feature of the QuickConvert 2.0 is its ease of use. I can quickly scan my old photos, slides, and negatives—one at a time—without needing any complicated setups or software installations. This is particularly appealing for someone like me, who might not be tech-savvy. The scanner operates independently, meaning no computer or drivers are required. I simply turn it on and start scanning. In just 2-3 seconds, I can convert a 4×6 photo or smaller into a digital file. The ability to press a size button to adjust the scan size makes it incredibly user-friendly.
What I find particularly remarkable is the quality of the scans. With a resolution of 14 MegaPixels (and an interpolated 22 MegaPixels), the details captured in my photos come to life. I can store these images as JPEG files on an SD memory card, which is a seamless way to keep my digital library organized. The scanning quality is impressive, with pixel dimensions of approximately 3824 x 2512 pixels, ensuring that even the smallest details in my cherished photos are preserved.
The built-in rechargeable battery is another thoughtful feature. It allows for cord-free scanning, which I appreciate as it adds to the convenience of using the scanner anywhere in my home or even while traveling. Just a reminder, it’s important to charge the device fully before diving into a scanning session to avoid interruptions. Additionally, the 5” instant preview LCD screen allows me to check the quality of each scan right away, ensuring that I don’t miss any details or accidentally scan a blurry image.
One of the unique benefits of the QuickConvert 2.0 is its ability to scan photos without requiring me to remove them from albums or mounts. This is a game-changer for someone like me who has family albums that are fragile and irreplaceable. I can preserve the memories without risking damage to the originals. However, it’s important to note that this scanner does not support 5×7 photos, so I’ll need to keep that in mind when planning my scanning sessions.
Moreover, the 2-year warranty and tech support from ClearClick, a small business based in the USA, offers me peace of mind. It’s reassuring to know that I’ll have assistance if I encounter any issues. Supporting a small business while investing in a product that enhances my ability to preserve memories makes this purchase even more appealing.
In summary, the ClearClick QuickConvert 2.0 Photo, Slide, and Negative Scanner is an excellent investment for anyone looking to digitize their old photographs and memories with ease and quality. Its user-friendly design, impressive scan quality, and portability make it a must-have for memory preservation. If you’re like me and have a collection of old photos that you want to save for future generations, I highly recommend giving this scanner a try. It’s time to turn those dusty old memories into digital treasures!
Feature Description Scanning Capability Scan 4×6 photos, slides, and negatives (one at a time) Scan Speed 2-3 seconds per scan Resolution 14 MegaPixels (22 MegaPixels interpolated) Storage Format Saves as JPEG files on SD memory card Battery Built-in rechargeable battery for cord-free scanning Display 5″ instant preview LCD screen Warranty 2 years with tech support
Get It From Amazon Now: Check Price on Amazon & FREE Returns
Why Converting Negatives to Digital Has Helped Me
Converting my old photo negatives to digital format has been a game-changer for me. For years, I had boxes filled with memories captured on film, but they were mostly collecting dust. Once I took the plunge to convert them, I was able to relive moments from my past that I thought were lost forever. Seeing those images come to life on my screen brought back cherished memories and emotions that I had almost forgotten.
Another significant benefit I’ve experienced is the convenience of sharing my photos. With digital files, I can easily upload my favorite images to social media, create digital albums, or even print them out whenever I want. No more fumbling with bulky photo albums or worrying about the condition of my negatives. Plus, digital photos are far easier to organize, allowing me to sort and categorize them in a way that makes sense to me.
Lastly, converting my negatives to digital has ensured that my memories are preserved for the long haul. Film can degrade over time, and I was worried that my precious photos would fade away. By digitizing them, I’ve created backups that I can store safely on my computer and in the cloud. This gives me peace of mind, knowing that my
Buying Guide: Convert Negatives to Digital
Understanding My Needs
When I decided to convert my old negatives to digital, I first took a step back to understand my needs. I had a collection of family photos and memories captured on film, but I wanted to preserve them in a more accessible format. I considered how I planned to use these digital files—whether for sharing with family, creating photo books, or simply for personal storage.
Choosing the Right Method
Next, I explored the various methods available for converting negatives to digital. I found that I could either use a professional service or do it myself. Each method has its pros and cons. A professional service offered high-quality results but at a higher cost, while DIY methods gave me control over the process but required some investment in equipment.
Evaluating DIY Options
If I decided to go the DIY route, I needed to evaluate the options. I researched scanners specifically designed for film negatives, as well as flatbed scanners that could handle multiple formats. I also looked into dedicated photo editing software that could enhance my scanned images. Understanding the resolution and color depth was crucial, as I wanted to ensure that my digital images would reflect the quality of the originals.
Assessing Professional Services
For those considering professional services, I found it essential to look at reviews and compare pricing. I wanted to ensure that the service I chose had a good reputation for handling negatives carefully and provided a clear outline of what I would receive. Additionally, I considered turnaround times, as I was eager to see my memories come to life in digital format.
Understanding Costs
The cost of converting negatives to digital was another important factor for me. I made a budget that included potential expenses for equipment, software, or professional services. I quickly realized that while DIY methods could save money in the long run, they required an initial investment that I had to be prepared for.
Considering Image Quality
Image quality was a top priority for me. I knew that not all scanners or services produce the same quality of output. I read about the importance of resolution and color correction, which can make a significant difference in how the final images look. I aimed for a solution that would provide high-resolution scans to preserve the details in my negatives.
Preparing My Negatives
Before diving into the conversion process, I made sure my negatives were clean and free of dust or fingerprints. I learned that even minor smudges could affect the quality of the final digital images. I used a soft cloth and a gentle cleaning solution to ensure my negatives were in the best possible condition before scanning.
Backing Up My Digital Files
Once I had my negatives converted, I knew that backing up my digital files was crucial. I created multiple copies of the images, storing them on an external hard drive and in cloud storage. This way, I could protect my memories from potential data loss, ensuring they would be preserved for future generations.
Final Thoughts
Converting negatives to digital was an exciting journey for me. I felt a sense of satisfaction knowing that I was preserving my memories in a format that would last. Whether choosing a DIY method or a professional service, I learned that careful consideration of my needs and preferences was key to achieving great results. Now, I can easily share my cherished moments with family and friends, and I look forward to creating new memories with these digital images.
Author Profile
-
Hi, I’m Dana Weaver a creative at heart with a decade-long career in content creation, branding, and visual storytelling. Back in 2019, I co-founded Ettakit, a Chicago-based digital content and branding agency built to help consumer packaged goods and wellness brands come to life through impactful visuals and strategy. That journey brought me incredible experiences from producing photo and video campaigns to crafting brand identities and web designs that told deeper stories. Along the way, I was humbled to be named in Forbes’ 30 Under 30 for Marketing & Advertising in 2022.
Starting in 2025, I began a new chapter stepping into the world of personal blogging. These days, I write hands-on reviews and informative articles about everyday products from wellness essentials and smart gadgets to home tools and parenting picks. After years of helping brands craft their voice, I wanted to use mine to bring honesty, curiosity, and clarity to the review space.
Latest entries
- May 3, 2025Personal RecommendationsWhy I Can’t Get Enough of Kendrick Lamar T-Shirts: A Personal Journey into Hip-Hop Fashion
- May 3, 2025Personal RecommendationsWhy ‘The Legend of Zelda: Majora’s Mask’ on Nintendo 64 Captivated Me: An Expert’s Journey Through Its Dark and Enigmatic World
- May 3, 2025Personal RecommendationsWhy I Switched to an Extension Cord with a Flat Plug: My Expert Experience and Tips for Choosing the Best One
- May 3, 2025Personal RecommendationsWhy I Switched to USB 3.0 to Type C: My Personal Experience and Expert Insights